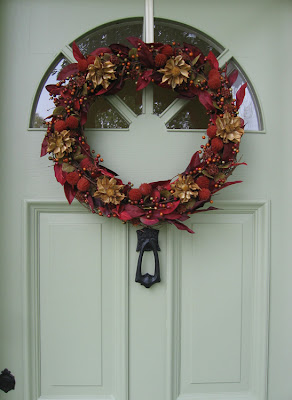
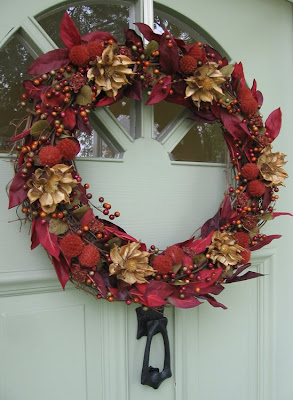
Yesterday I purchased a sweet little fall wreath and today I actually, pinch-myself-I-really-did-it, made my very own.
I am so amazed at how easy it can be to make something yourself when you lose the "I can't do it" and "It won't look perfect" attitude (which I usually have)(but I'm getting better). Here's a step-by-step picture tutorial of how it went down...... :)

I went to Michael's and purchased a grapevine wreath for $4.99 as well as some faux leaves, berries, and other goodies that I don't know the name of (they were all on sale for 40% off). I don't really like the look of faux greenery (I know I already mentioned that yesterday) so I searched for the most realistic stuff I could find. I borrowed some 24 gauge wire from my mom, found Alex's wire-cutter from his toolbox, and dug out my own little gluegun.
 First, I separated strands of these red leaves and stuck them into the grapevine. I did two rings of leaves, one inner ring and one outer ring.
 I used wire to attach pretty much everything. I had to use surprisingly less than I thought. Once I twisted the wire around the parts I wanted to attach, I trimmed off the excess (with the wire cutters) and turned the wire around so it was almost invisible.
 Next I added some more leaves, these ones had a pretty texture and a mixture of colours: green, orange, and red. I only added one ring of these leaves in the middle of the wreath.
 Next, I untangled this mess of berries. That was fun! Um, not really. They kept falling off and rolling all over the floor! Let's pretend I didn't share that part. I thought I was going to cut small pieces off and stick them into the grapevine but I ended up just placing the strand of berries all the way around and securing it with wire.
 I thought these little orange pom pom things were adorable. I cut them off in twos and didn't use the grassy bits. After spacing them out around the wreath I glued them down with my gluegun.

I saw these (dried? faux?) flowers and had to have them. They weren't in the fall decor section and they were a bit expensive. $8.49 for 3 of them. Of course I had some 40% off coupons so it wasn't so bad. After figuring out where I wanted them, I also glued these down with my gluegun.

 I also liked the texture of this stuff. I only had one bunch, though, so I cut it into little pieces.
Then I glued them into any little bare spots on the wreath. I forgot to take a close-up of those but here's a picture of one of those flowers again, just because it's pretty.

Here is the finished wreath on my front door. I'm so happy it turned out!


I need to find a better wreath-hanger for our front door though. Or I'll paint the one I have to match our door colour.

And a little close-up. I just hope the whole thing doesn't get smushed when I close the storm door. :)
I'm linking to all of these. Yeah, I know. I'm annoying addicted.

Style Feature Saturday @ Perfectly Imperfect

Style Feature Saturday @ Perfectly Imperfect
Show and Tell Friday @ My Romantic Home
Frugal Friday @ The Shabby Nest
Saturday Soiree @ A Little Lovely
Weekend Wrap-Up Party @ Tatertots and Jello
Fall Nesting Party @ The Inspired Room
Fab Friday @ Frugal & Fabulous Design
Show and Share Day @ Just a Girl
The Sunday Showcase Party @ Under The Table and Dreaming
Saturday Nite Special @ Funky Junk Interiors
Check Me Out Saturday @ A Vision to Remember
Make It For Monday @ Cottage Instincts
Countdown to Fall @ Domestically Speaking
Motivate My Monday @ Keeping It Simple
Making the World Cuter Monday @ Making the World Cuter
Anything Related Tuesdays @ All Thingz Related
Tute-In Tuesday @ Oops! I Craft My Pants


So pretty!! It really looks like one that you would buy at the store for $50. Thanks for sharing the tutorial!
ReplyDeletegreat job! looks awesome!
ReplyDeletevery pretty! You are an amazingly crafty person!
ReplyDeleteBeautiful!! Looks absolutely stunning. I love bold door decor :]
ReplyDeleteThis turned out beautifully!
ReplyDeleteLove it! Cant wait to make it!
ReplyDeleteSo very lovely. I've been wanting to make my own, lately. I think I shall, out of all those sucker branches one prunes off of the young saplings in spring.
ReplyDeleteYou did a GREAT job! I am so ready for fall! I think i need to make one of these!
ReplyDeleteHave a pretty day!
Kristin
You did a great job it is beautiful!
ReplyDeleteKelli
xoxo
loveoursimplelife.blogspot.com
Your wreath looks great- love the colors you used! I was looking for a tutorial and yours is awesome.
ReplyDeleteThat looks great! I love the colors and all the texture!
ReplyDeletesarah, it looks so cute, and i think it would transition well into christmas as well with the color scheme. you are so clever! i am no good at wreathing, aka the art of wreath making.
ReplyDeleteGreat job, Sarah. I love it! Those orange poms poms are pretty adorable :)
ReplyDeletelooks gorgeous!!!! :)
ReplyDeleteIt turned out great! I love the dried flowers on it. Looks so good against your white door.
ReplyDeleteBeautiful wreath! Love the color.
ReplyDeleteLove the colors! It turned out great!
ReplyDeleteWOW!! I think this is one of the prettiest wreaths I've seen!! :)
ReplyDeleteVery pretty wreath and great tutorial...now I want to make a new fall wreath for my front door. Off to JoAnn's I think .
ReplyDeleteThat wreath is GORGEOUS! I desperately need a nice new fall wreath so I might give this a shot myself!
ReplyDeletelove the wreath...stunning
ReplyDeleteBeautiful!
ReplyDeleteSo pretty! Thank you so much for sharing your creativity in the DIY Fall Festival! I'm including it in this week's highlights!
ReplyDeleteRoeshel
Wow, what a gorgeous wreath!!! Love all the colors and textures. Great job! :)
ReplyDeleteHow welcoming for the season!
ReplyDeletethat is soo cute!! very inspirational :-)
ReplyDeleteOh my word I used two of those exact same flowers for the wreath I just finished! It's here: http://diyingtobedomestic.wordpress.com/2010/10/05/diy-5-fall-wreath/
ReplyDeleteThat is so pretty! I bought a straw wreath on a whim today and want to make a fall wreath with it. This probably wouldn't work with that though!
ReplyDeleteThat is so pretty! I bought a straw wreath on a whim today and want to make a fall wreath with it. This probably wouldn't work with that though!
ReplyDeleteSo very lovely. I've been wanting to make my own, lately. I think I shall, out of all those sucker branches one prunes off of the young saplings in spring.
ReplyDeletelove the wreath...stunning
ReplyDelete