Cute Find Alert

13

Thursday, September 30, 2010


I know you know how hard it is for me to find cute things in this lame-o town that hardly has any good stores. We're about 4 hours North of Toronto and even our chain stores only get the leftovers from stores down South. It's a bummer. It's also turned me into a Homesense stalker. I go in all.the.time. in search of anything cute. It doesn't help that I'm super duper picky (not in a good way) and rarely find things that are cute enough to come home with me.

I have been searching for lampshades for, oh, about 3 years. What have I found? Nothing. Nada. Zip. I saw a few neat ideas over the summer (all those link things I'm addicted to) and I've been contemplating painting, fabric-covering, or sewing ribbon onto a plain lampshade.

So after one of my exhausting rewarding days of teaching last week I wandered in to Homesense for a little pick-me-up. Sidenote: My class is a bit of a handful this year. Please help me find the patience to make it through this year. Please, please, please.

Anyway, I was walking along feeling all tired and sorry for myself when out of the corner of my eye I saw the cutest lampshade that ever lived. They had two sizes, I decided to purchase the smaller of the two to use on a floor lamp that had a bell-shape shade that kinda bugged me.

I'm not sure if I'm loving the blue and white shade in the yellow living room, but I do know that I love the shade and it may just look perfect in one of our other rooms.

Thank you Homesense. Just when I start to give up on you, you always seem to pull through.

Cubby Shelf Makeover - UPDATED

40

Saturday, September 25, 2010

I have some sort of odd fascination with tiny drawers and cubbies. Don't know why. Just love them. For a long while I've had my eye on this little cubby-shelf-thing from Pottery Barn. At first they only had it in a wood finish but then a few months later they came out with a white painted finish. Ahhhh, white. The price wasn't too crazy, $129 bucks I believe, but I still didn't want to pay it. When I saw this similar version on my last road trip for $20 I snatched it right up.


Image: Pottery Barn


Image: Pottery Barn

From afar, it looked okay as it was. However if you looked closer, you would have noticed that it was a cream colour and had a terrible check-out-my-random-ugly-brushstrokes paint finish on it. So I did what anyone else with an obsession with white would do.


I sanded it, primed it, painted it white, and lightly distressed it.


I had ordered alphabet and number stamps specifically so I could label each cubby. Little did I know that it would be a total nightmare!


First, I tried to stamp with ink directly onto the painted wood. The ink just smeared everywhere. Then I tried to stamp with grey acrylic paint but unless you have a foamy ink pad the paint wouldn't spread evenly onto the stamps. Then I tried to find some tiny metal label holders but couldn't find any small enough. Finally I decided to stamp on paper, however regular paper was way too bright to match my paint colour (Simply White by Benjamin Moore). Finally I ended up painting the paper to match, then stamping the number words on the paper. I cut the words out and secured them to each cubby with a tiny bit of Mod Podge (first time using it) but had to be careful not to touch the ink because it would smear. Soooooo frustrating.


It still turned out pretty cute, although I still wish the words could've been stamped directly on. Oh well, everything can't always be perfect, right?


I plan on using this little cubby-shelf somewhere in our breakfast room (which we're still working on oh so slowly). I haven't decided if I'm going to leave the back open so you see the wall colour or add a white back to it so that it looks more like the Pottery Barn one.

What do you think? Back or no back?

UPDATE:

Thank you for all of your lovely suggestions and comments! I took some of your advice (you guys are awesome) and added a back to the shelf. For some reason I kept envisioning a solid back covered with scrapbook paper or fabric but some of you suggested beadboard and HELLO! I love beadboard and I even had some left over from our bathroom reno.

Alex cut a strip of pre-painted beadboard into 5 equal sections and we attached them to the back of the shelf with carpenter's glue and little stapler nails. I like the back 'cause it kind of finishes it off a bit more.

Please forgive the lousy photos but it's getting dark over here and there is hardly any natural night left. Oh no, that means this beautiful, lazy weekend day is almost over (crying a little).


I just had to add that last picture in. That's Roary. He supervises all of my projects....... :)


Frugal Friday @ The Shabby Nest, Everything But The Kitchen Sink @ A Little Knick Knack, Weekend Wrap-Up Party @ Tatertots and Jello, Show and Share Day @ Just a Girl, Fresh Coat Friday @ Life in The Fun Lane, Saturday Soiree @ A Little Lovely, Check Me Out Saturday @ A Vision to Remember, The Weekend Wrap-Up @ It's So Very Cheri, Sunday Showcase Party @ Under the Table and Dreaming, Style Feature Saturday @ Perfectly Imperfect, Make It For Monday @ Cottage Instincts, Metamorphosis Monday @ Between Naps on The Porch, Making the World Cuter Monday @ Making the World Cuter, Anything Related @ All Thingz Related, Nifty Thrifty Tuesday @ Coastal Charm, Make it Yours Day @ My Backyard Eden, Power of Paint Party @ Domestically Speaking, Saturday Night Special @ Funky Junk Interiors

Two Teeny Tiny Butterfly Pictures

25

Friday, September 17, 2010


I got my little stamps in the mail a few days ago (so fun). I decided I should probably use them for something other than filling up my "to-do" notebook with a million random words and sayings. Not that I did that because that would be ultra nerdy.


I spied these teeny tiny picture frames at Michaels awhile back and thought they would be perfect for my little cubby-thing once I finish it's mini-makeover. Also, it's kind of unusual to find such a tiny frame that comes with a matte. I picked two of them up on my way home from work.


I wasn't digging the shiny/sparkly pearl look of the frames so I spraypainted them with flat white paint. Then I decided to use the supplies from my 3-d butterfly collage (that was for a friend's baby shower) to make my own (miniature) version.


I used white scrapbook paper for the backgrounds, used my butterfly craft punch and scrapbook paper for each butterfly, and used my new alphabet stamp to stamp the words.


Easy peasy, teeny tiny, and pretty darn cute.
P.S. Would it be weird if I made a dozen more of these and put them all over the house?

These links have lovely things goin' on:
Show and Share Day @ Just a Girl
Friday Link Party @ Creation Corner
Everything But The Kitchen Sink @ A Little Knick Knack
Weekend Wrap-Up Party @ Tatertots and Jello
Show Off Sunday @ House of Thrifty Decor
Sew Crafty Saturday @ Sew Chic and Unique
Its So Very Creative @ Its So Very Cheri
Sunday Showcase Party @ Under The Table and Dreaming
Make It For Monday @ Cottage Instincts
Lucky Linky Tuesday @ Lucky Star Lane

Breakfast Room Progress

5

Monday, September 13, 2010


Unrelated Note: Thank you so much to those who left comments for me about the fall wreath that I made on the weekend. Your comments are so motivating! I still really like the wreath but ended up taking it down (for now). The wreath looked all good for my little front-door photoshoot in my pajamas but when I got finally got dressed at 7:00 p.m. and took a look from the street I noticed that it totally clashed/clashes with the hot pink flowers that are still blooming in my giant windowbox. I even thought about pulling out those darn pink flowers. Now I feel kinda silly that I was in such a rush to decorate for fall. I think I still have time.... :)

In other news, we finally made some headway in the breakfast room. Here's what we got done this weekend:

- sanded all patches (soooo dusty)
- washed everything with tsp (so long dust)
- primed all patches
- primed ceiling (um, sore neck much?)
- installed trim on baseboards (Alex let me use the nailgun, buuuuut only for one nail 'cause I did it wrong)
- installed trim around new door (looks soooo much better with no insulation showing!)
- fixed busted baseboard (way to go MacGyver aka Alex)
- caulked all new trim (must-do with old, crooked walls)
- painted 2 coats of wall colour (best part! hello green!)
- installed new closet door (goodbye hideous louvered bifold door, I've been cursing you)

Random Funny Little Story:

One day while Alex was in the electrical aisle (yawn) at Lowe's, I wandered into the paint section to browse the colours. I found a pretty colour called "Seagrass" by Para Paints which is from Sarah Richardson's colour collection. I thought it was very pretty, and I knew I wanted green, so I took the swatch home. Correction: I took 5-6 large paint chips to tape on the walls like a big swatch. Don't tell the paint people!!! I also took a few other paint colour samples to compare. After a few days I narrowed the colours down to two: Seagrass and Splurge (both by Para). I secretly wanted to choose Seagrass 'cause I liked the name better but decided on Splurge because the colour "looked softer" in my oh-so-professional opinion. So the other day I was looking at the paint chips again, because what else would I be doing on a hopping Friday night, when I noticed that the code/numbers for both paint colours were the same. Hmmm, strange. So yesterday I asked the lady at Lowe's why they had the same number and well, wouldn't you know, that they are the SAME COLOUR. Sarah Richardson just took a few Para Paint colours that she liked, renamed them, and stuck them in her collection. So all of that nerve-wracking decision making was for naught. I was trying to choose between the same colour. Please stop laughing at me now. In my defense, one swatch was big and one was little so they really did look sorta different.
So now comes the b-o-r-i-n-g part of painting the window trim, door trim, and baseboards white. Oh yeah, and the ceiling. I don't really like doing things in the order that's recommended. I'm also trying to sweet-talk Alex into putting up some crown moulding that matches the powder room. They are side-by-side after all so it makes sense that they would have matching mouldings, right?
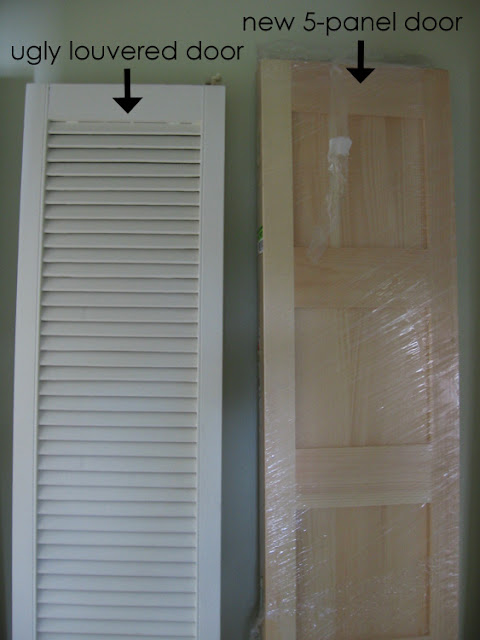
Don't worry, the new closet door will be getting the white treatment.

Now, I need your opinion. Do you think I can turn one 12x9 room into a mudroom/breakfast room/mini office?

I Like Pale and I Like Interesting

5

Sunday, September 12, 2010


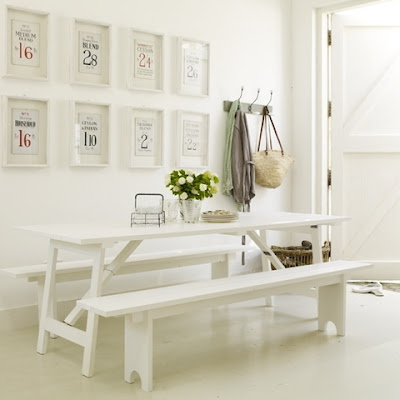
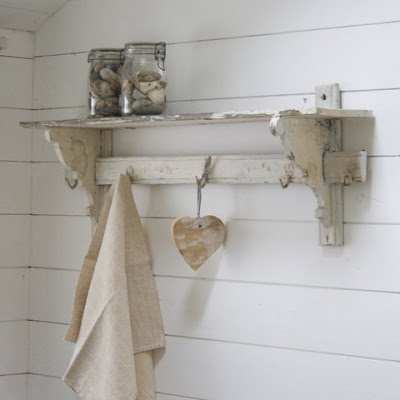
So one day when I was procrastinating doing anything productive surfing the net, I came upon this adorable little shop called Pale and Interesting. What a sweet name for a shop! I had never heard of it before so of course I clickety-clicked my way over to check it out. I do seem to like things that are pale. Interesting doesn't hurt either. My heart sank a bit when I saw that they were located overseas. Window shopping it would be for me, then.

Here are a few of my favourite items from their site. Only because I will never be able to shop there. I can justify shipping costs from many places, but not from overseas. Yet. (Oops, I wasn't supposed to write that.)


All photos courtesy of Pale and Interesting.

Ahhhh, eye candy.

DIY Fall Wreath - A Picture Tutorial

31

Saturday, September 11, 2010


Yesterday I purchased a sweet little fall wreath and today I actually, pinch-myself-I-really-did-it, made my very own.

I am so amazed at how easy it can be to make something yourself when you lose the "I can't do it" and "It won't look perfect" attitude (which I usually have)(but I'm getting better). Here's a step-by-step picture tutorial of how it went down...... :)


I went to Michael's and purchased a grapevine wreath for $4.99 as well as some faux leaves, berries, and other goodies that I don't know the name of (they were all on sale for 40% off). I don't really like the look of faux greenery (I know I already mentioned that yesterday) so I searched for the most realistic stuff I could find. I borrowed some 24 gauge wire from my mom, found Alex's wire-cutter from his toolbox, and dug out my own little gluegun.

First, I separated strands of these red leaves and stuck them into the grapevine. I did two rings of leaves, one inner ring and one outer ring.

I used wire to attach pretty much everything. I had to use surprisingly less than I thought. Once I twisted the wire around the parts I wanted to attach, I trimmed off the excess (with the wire cutters) and turned the wire around so it was almost invisible.


Next I added some more leaves, these ones had a pretty texture and a mixture of colours: green, orange, and red. I only added one ring of these leaves in the middle of the wreath.


Next, I untangled this mess of berries. That was fun! Um, not really. They kept falling off and rolling all over the floor! Let's pretend I didn't share that part. I thought I was going to cut small pieces off and stick them into the grapevine but I ended up just placing the strand of berries all the way around and securing it with wire.


I thought these little orange pom pom things were adorable. I cut them off in twos and didn't use the grassy bits. After spacing them out around the wreath I glued them down with my gluegun.


I saw these (dried? faux?) flowers and had to have them. They weren't in the fall decor section and they were a bit expensive. $8.49 for 3 of them. Of course I had some 40% off coupons so it wasn't so bad. After figuring out where I wanted them, I also glued these down with my gluegun.


I also liked the texture of this stuff. I only had one bunch, though, so I cut it into little pieces.


Then I glued them into any little bare spots on the wreath. I forgot to take a close-up of those but here's a picture of one of those flowers again, just because it's pretty.


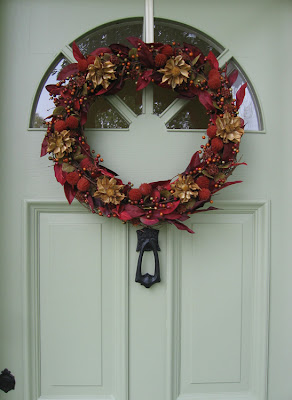
Here is the finished wreath on my front door. I'm so happy it turned out!


I need to find a better wreath-hanger for our front door though. Or I'll paint the one I have to match our door colour.


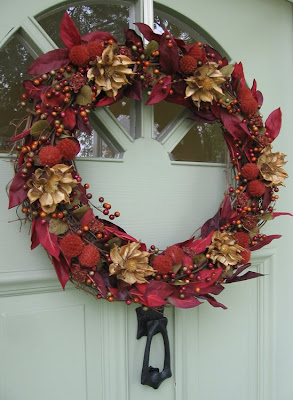
And a little close-up. I just hope the whole thing doesn't get smushed when I close the storm door. :)

I'm linking to all of these. Yeah, I know. I'm annoying addicted.

Visit thecsiproject.com
Style Feature Saturday @ Perfectly Imperfect
Show and Tell Friday @ My Romantic Home
Frugal Friday @ The Shabby Nest
Saturday Soiree @ A Little Lovely
Weekend Wrap-Up Party @ Tatertots and Jello
Fall Nesting Party @ The Inspired Room
Fab Friday @ Frugal & Fabulous Design
Show and Share Day @ Just a Girl
The Sunday Showcase Party @ Under The Table and Dreaming
Saturday Nite Special @ Funky Junk Interiors
Check Me Out Saturday @ A Vision to Remember
Make It For Monday @ Cottage Instincts
Countdown to Fall @ Domestically Speaking
Motivate My Monday @ Keeping It Simple
Making the World Cuter Monday @ Making the World Cuter
Anything Related Tuesdays @ All Thingz Related
Tute-In Tuesday @ Oops! I Craft My Pants
Autumn Leaves @ Centsational Girl
For The Love of Wreaths Party @ Domestically Speaking
Related Posts Plugin for WordPress, Blogger...

Cozy.Cottage.Cute. All rights reserved © Blog Milk Design - Powered by Blogger