Magazine Subscription Giveaway Winner

4

Monday, May 30, 2011


Thank you so much to everyone who left their names on my 750 followers giveaway post. I loved reading all of your individual comments. I could pinch your cheeks you are that cute. 

I used random.org to choose a name and whaddaya know it landed on #12. The lucky winner is:
She has a blog, too!

Caroline, as soon as you email me (cozycottagecute@hotmail.com) with your details and address I can set up your magazine subscription for you. Congratulations and thank you so much for following along!!! :)

Christie Antique Show - Been There and, Like, Bought Stuff

14

Sunday, May 29, 2011

I'll take one of each, please.

Whew. Just got back from my whirlwind trip down to Southern Ontario for the Christie Lake Antique Show. Despite the drizzle, muddy flip flops, and frizzy hair it was an all-round success. Everyone in our little entourage (me, my mom, my cousin, and my three aunts) seemed to find our own unique treasures. I'm so excited to show you what I brought home.

Another highlight of the day was the chance to meet-up with a few other Canadian design bloggers. Can you believe that I got to meet Jennifer of Rambling Renovators, Chris from Just Beachy, and Shannon from What's Up, Whimsy? Um, I did. And those girls are, like, famous. They've been on television and stuff. I'm pretty sure I'm also famous now just by association. They were really nice to me even though I'm sure they had no idea who I was. I think they do now after I asked them for about 10 autographs each. Hee hee hee. Kidding of course. Maybe.

I was able to snap a few pictures while I was there but man, is it ever impossible to take decent pictures when there are a zillion people fighting over ladders and calling dibs on cute things. (Wait a minute, that was me.)

Here are some items that caught my eye:


Hmmmm, I'm noticing a theme here..... pastel colours, chippy paint, cute details. Dreamy.

A lot of the above items were waaaaay too expensive for me, but a few of them made it home. Woo woo!

I'll share my finds with you soon, as well as my ultimate plans for them. But right now Roary is giving me the dopiest look and sending me telepathic messages that he would like a walk. I think he missed me. :)

Old, Antique Windows Are Pretty In Your Dining Room

19

Tuesday, May 24, 2011


{Note: If you haven't entered my 750 Followers Giveaway you still can. Weeeeeeeeeeeeeeeeee!}

----------------------------------------------------------------------------------------------------------


About a year ago I bought an old, antique-looking window for our dining room. About six months ago, I dug it out of hiding and contemplated cleaning it up and hanging it somewhere (to read that post click here). But then...... I didn't. I put it back in the basement and forgot allllll about it.

Yesterday the weather was miserable and I was feeling lousy from a poopy cold so I decided to clean it up and finally hang it up somewhere.  

I used a razorblade knife to scrape off any paint that was on the glass. Then I used some paper towels, q-tips, and windex to clean the glass in all the little nooks and crannies. (I held my breath in case there was any lead paint involved. Don't try my technique at home.)

I decided to hang it up over the doorway of the dining room. Here is a photo of the spot before:


Here is the spot now with the window hung up all fancy-like:


I love how the chippy, brown paint ties in with the bamboo shades in the living room, the rattan furniture in the sunroom, and the barnboard top of the dining room hutch.

It was reallllly heavy. We attached two brackets to the back of the window that can hold up to 35 pounds each. Alex really liked it when I asked him to hold it up once twice three times okay ten times.

It has a number on the bottom corner. I love that you can see it when you're walking by.


Now that I took this window out of the basement I have more room to put stuff that I find at the antique show this weekend. Woot woot!


Linking to:

Masterpiece Monday @ Boogieboard Cottage
Amaze Me Monday @ Dittle Dattle
Twice Owned Tuesday @ House of Grace
Nifty Thrifty Tuesdays @ Coastal Charm

I ♥ My Readers Giveaway

102

Sunday, May 22, 2011

{This giveaway is now closed.}


It never fails to amaze me when I look over to the sidebar of this blog to find that someone new has signed on to be a reader. I almost always give out Barney Stinson high-fives even if there's no-one in the room with me. I also yell out, "Yessssssssssssssssssssss" in a really annoying way. (Just ask Alex and Roary.) Then I cross my fingers and hope you will stick around even though I have terrible grammar, paint everything white, and bake muffins for fun. Loser with a capital L. ;)

I am so very grateful for your kind and funny comments that you always seem to leave for me. I just want you to know that even though I never seem to have enough time to respond to every one, I appreciate and look forward to them so much. 

I wanted to celebrate reaching 750 official followers!!

(Even though it technically only says 735 followers right now.)(A girl can dream.)

I've been wracking my brain for a fun little present for you and when I picked up my latest magazine the lightbulb went off.

I will be giving one of my dear readers (you!) a year's subscription to Country Living Magazine (that's 10 issues).


That way you will have something fun to look forward to every month. And each time you open your mailbox and see the newest issue you will think of me. Hee hee!

Giveaway Guidelines:

{Open to Canadian and U.S. Residents.}
{Giveaway will close next Sunday at 7:00 p.m.}
{Three chances to win. Make sure to leave a separate comment for each entry.}

Chance #1

1. Just be a follower of this geeky blog. Let me know in a quick comment. Don`t forget to leave your name! And an email address if you don't have a blog where I can reach you.

Chance #2

2. Leave a comment letting me know what kind of posts you prefer: before and afters, house renos, room decorating, crafts, recipes, inspiration photos, random everyday stuff, yard/gardening, learning photography, etc. Just curious, k?

Chance #3

3. Spread the love and mention this giveaway on your Blog, Facebook, or Twitter. Leave a comment letting me know that you did. Actually reaching 750 would be dreamy. :)


So-o-o Good Apple Strudel Muffins

8


The weather was all rainy and yucky this morning so instead of going outside to play in the yard (play really means work) I decided to try a brand new muffin recipe. I had never tried baking any that called for apples before because I'm not particularly fond of mushy (a.k.a. cooked raisin) textures. I decided to live on the edge and try these apple strudel muffins anyway. 

So-o-o Good Apple Strudel Muffins

* Indicates where I "tweaked" the recipe

Ingredients:

2 cups all-purpose flour
1 teaspoon baking powder
1/2 teaspoon baking soda
1/2 teaspoon salt
1 teaspoon cinnamon*
1/2 cup butter
1/2 cup white sugar*
1/2 cup brown sugar*
2 eggs
1 1/4 teaspoons vanilla
3 cups grated apple*
----------------------------
1/3 cup packed brown sugar
1 tablespoon all-purpose flour
1/8 teaspoon ground cinnamon
1 tablespoon butter


Directions:

1) Preheat oven to 375 degrees F (190 degrees C). Line muffin tin with 12 muffin liners.

2) In a medium bowl, mix flour, baking powder, baking soda, salt, and cinnamon.

3) In a large bowl, beat together butter, sugar and eggs until smooth. Mix in vanilla. Stir in apples, and gradually blend in the flour mixture. Spoon the mixture into the prepared muffin pan.

4) In a small bowl, mix brown sugar, flour and cinnamon. Cut in butter until mixture is like coarse crumbs. Sprinkle over tops of mixture in muffin pan.

5) Bake for 18-20 minutes in the preheated oven, or until a toothpick inserted in the center of a muffin comes out clean. Allow to sit 5 minutes before removing muffins from pan. Cool on a wire rack.


The uncooked batter was soooooo yummy. So what if I licked the batter bowl completely clean. Everyone else does it too, right? Right!?!?


Gotta love the sweet, crumbly topping.


Verdict? The apples weren't even mushy!!! Booya! This recipe will be added to the recipe collection a.s.a.p.

Linking to:

Recipe Swap Sundays @ Remodelaholic
Sweets For a Saturday @ Sweet As Sugar Cookies
Sweets This Week @ Sugar Bananas
Sweet Indulgences Sunday @ A Well-Seasoned Life

A New Lens, Twigs, and Lightroom Is Awesome

11

Friday, May 20, 2011


Last week some time, Alex happened to mention to some of his co-workers that I'd started taking a photography class. It turns out that one of those co-workers has a Toronto-based photography business (Olya Smith Photography) that she runs on the side of her daytime job. Alex mentioned to her that I was interested in getting a new lens so she offered to come over and let me try all of her fancy lenses


I was a bit nervous and intimidated once I took a look at her website and portfolio. I have a portfolio. It's of Roary and muffins.

But then she came over. And she was wickedly awesome. And nice. And pretty. Not only did she show me how to shoot photos in raw to get better quality, she gave me a quick tutorial on how to process the raw photos in Lightroom.


Oh. My. Goodness.

Buh bye, Photoshop Elements. It was nice knowing you.

I still only barely know how to use Lightroom but I am in love with the program already.


So, long story short, Alex ended up surprising me last night with a new lens. He got me the Canon EF 50mm f/1.8 II. It's cute, light, and very inexpensive. Just perfect for some shallow depth of field pictures that I am currently obsessed with.

I used my new lens to take the above photos (of twigs because I don't have any muffins). I think I love it already. What are you using for your photos??

Linking to:

Photo Feature Friday @ A Rosy Note
Photo Friday @ Milestones and Memories

Maybe I'll See You At The Christie Antique Show

8

Thursday, May 19, 2011

Not this weekend but next (that's so soon, woot woot!) I'll be heading down to the Christie Antique Show in Southern Ontario. I've been formulating my shopping list over the past few weeks and will be on the look-out for the following items:

1) Some corbels/brackets

Image - Country Living
2) A collection of vintage keys

Image - Handmadeology

3) A few chippy benches

Image - Heather Kowalski
4) An old ladder

Image - Pale and Interesting

5) Anything else of the cottage, cozy, or cute variety

-----------------------------------------------------------------------------------------------------------

Anyone else out there going to the show? Will I see you there??? :)

Yard Working It Up

9

Sunday, May 15, 2011


Soooo, how's your yard work coming along? I'm still in an imaginary lawn competition with the house down the street. For five years they've tried to have a nicer yard than me but not for long.... dun dun dun.

I absolutely won't blow dandelion seeds into their yard as I'm walking by their house because that would be so mean. Who would even think of that??? (Hanging my head in shame.)

See the flower above? It's a perennial. I just learned what that meant the summer before last. I don't know what it's called though. For now I'll call it.... purple flowerisculus.  

Last weekend my little wanna-be perennial garden looked like this:


My pretty garden full of dead leaves and garbage. Today I cleaned it up a bit. I raked all the leaves, pruned all the dead flowers and stems, and added some nice, rich soil:


I still have no idea what I planted or why I planted them in that weird configuration. All I remember is that there are some peonies, some cone-flowers, and some clematis in there somewhere. Hopefully they get bigger and, you know, start to look nice or something.

I also spent the day fixing the hundred pee spots all over the front yard. I dug out all the dead grass and then filled the spots in with top soil, grass seed, and starter fertilizer.


I also over seeded some bare spots:


It's still too early to plant any annuals where we live (Zone 4a) but hopefully I'll be able to fill up my empty window-boxes next weekend. I'm debating whether to go with a white/green scheme this year or use the same yellow/white/purple/pink scheme as last year.  

P.S. Alex worked on the lower level of our backyard deck today. He started it late last summer and wasn't able to finish before the winter. I am so excited that we'll finally have a deck this summer! We still have a lot of finishing touches to do (railings, stairs, etc.) so I'll try to post some progress pictures as we go along. If you're interested in checking out Phase I of the deck project, click here.

P.S.S. Thank you so much for your comments on the shutters we made and installed last weekend. I appreciate your feedback so much!!!

P.S.S.S. I'm on Week #2 of my photography course and am sort of getting the whole aperature, shutter speed, ISO thing. I snapped a few pictures tonight on my walk with Roary and guess what.... I didn't have my camera on any of the automatic settings! Yeah!!! 


Creating Some Curb Appeal With Shutters

54

Monday, May 9, 2011

The fun part!

On Saturday I wrote a post explaining how to make board-and-batten shutters. I purposefully left out the best part (the after photos) so that you'd come back for more.... muhahaha! Well, sort of. We also hadn't completely finished them yet.
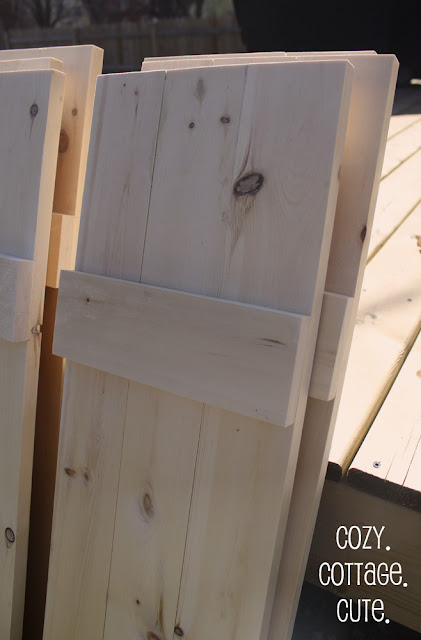
Shutters before primer and paint.

On Saturday we built the shutters, sanded them, and primed them. (For more details about those steps, see the above link.)
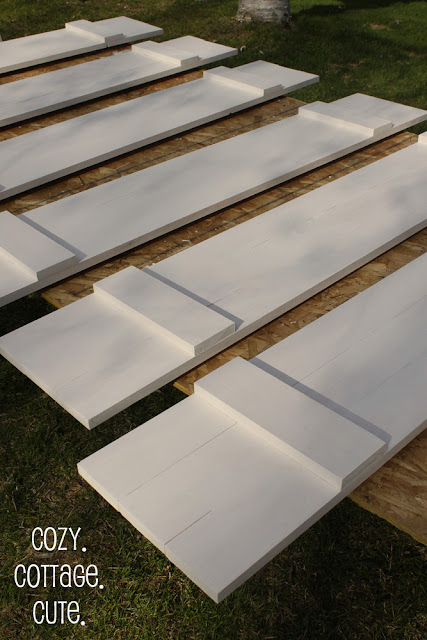
Primed shutters.

Yesterday we did the fun parts. We painted them, added some decorative hardware, and installed them.

I used two coats of paint using a colour called Nature Lover from Benjamin Moore. I chose a low-lustre finish made for exterior use. Once the paint was drying I drove around town looking for some hardware to add the finishing touch. I found some gate hinges at Lowe's that fit perfectly on the battens. They were quite pricey, but hey, these stinkin' shutters were my birthday present after all. The hinges were $9.99 for a package of two and we needed six packages. :S Oh well, they're cute and that's all that counts.
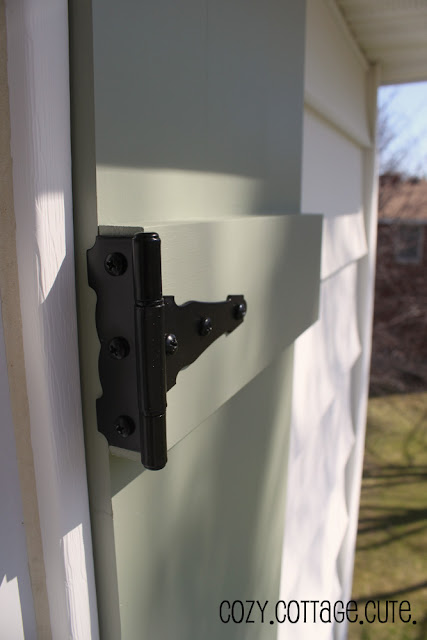
The hinges are just for decoration. I sure love decorations.

To install the shutters, Alex had a brilliant idea and used 4" deck screws underneath the hinges so you wouldn't see them. Genius, I tell ya, genius. Oh wait, did I say that was Alex's idea? It was totally mine.

He used big, long 4" deck screws because we were installing them on siding. They had to be long enough to go through the shutter, the siding, some foam, and a little bit of stucco. He pre-drilled some holes on a slight upward angle (to prevent water running in). Then he added a bit of caulking to the hole before screwing the shutters on. 

{Note: If we were installing them onto brick, we would have used concrete screws drilled into the brick (not the mortar) on a slight upward angle as well.}


Here's how one set looks installed. The next picture will show you how all three sets look.


And now for the before and after photo. Woohoo! We have shutters!! Finallyyyyyyyyyyyyyyyyyyyyy!

Click to enlarge!

Here are a few more photos just because I must have taken a million. Don't forget that the house looks bare at this time of year because I haven't planted any annuals yet and all of the other plants are still waking up!
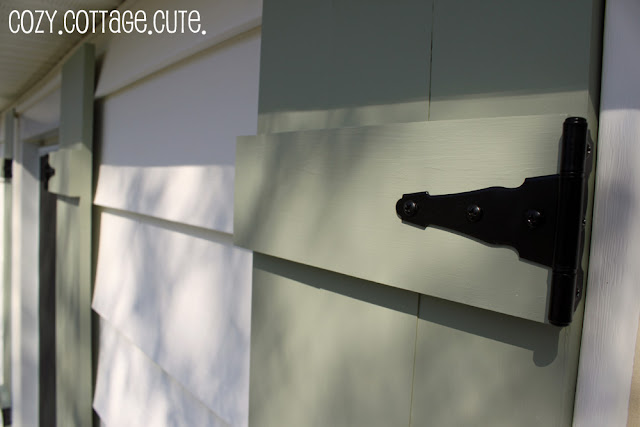
We clamped the boards really tight together because we knew that they
would shrink over time and leave larger spaces in between each board.

How about for fun we reminisce about how plain and ugly the house was when we first bought it? Okay. Here is the real before photo:


If you have any questions about anything I might have missed, let me know in an email or comment and I'll get back to you a.s.a.p. :)

Linking To:

Show Off Your Cottage Monday @ The House in the Roses, Metamorphosis Monday @ Between Naps on the Porch, Just Something I Whipped Up @ The Girl Creative, Transformation Thursday @ The Shabby Chic Cottage, Show Off Your Stuff Party @ Fireflies and Jellybeans, Show and Tell Friday @ My Romantic Home, Feature Yourself Friday @ Fingerprints on the Fridge, Flaunt it Friday @ Chic on a Shoestring Decorating
Related Posts Plugin for WordPress, Blogger...

Cozy.Cottage.Cute. All rights reserved © Blog Milk Design - Powered by Blogger