Hooks in the Side Entry

12

Wednesday, February 20, 2013


I've mentioned before that we have a teeny tiny addition on our side entry that the previous owners built. I'm grateful for the extra few feet of space since the original house design had people walking in right onto the stair landing!
 
While I'm grateful for the little bit of extra space that the addition provides, I'm not grateful for the design. Nothing, and I mean nothing matches the rest of the house. Each wall is a different material, there is no door on the little coat cubby, and there is light beige carpeting that is no longer light beige if-you-know-what-I-mean.
 
Awhile back I decided to organize the little coat closet nook since it had become a catch-all for all kinds of ugly junk. Phonebooks, flashlights, old newspapers, hats, dog toys, you name it.
 
With that spot organized and looking pretty, my next problem was finding a place to store all of Coop's little jackets and snowsuits.
 
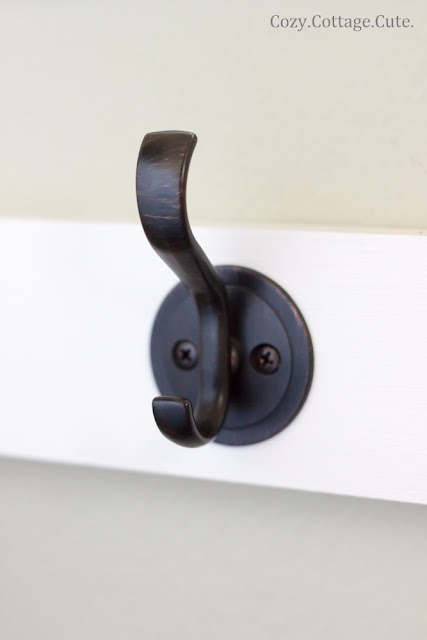
We decided to add a small row of hooks along one of the walls for an extra bit of hanging storage.
 
This was a super easy project. One of those things that we wish we had done months ago! We picked up a 4-foot piece of pine as well as five oil-rubbed bronze hooks from Lowe's.


We cut the board to size, primed it with indoor, all-purpose primer, painted it with two coats of leftover trim paint (Simply White by Benjamin Moore), and screwed in the hooks. (My clever hubs made sure to conceal the screws underneath the hooks.)
 
Don't get me wrong, the space is still small and still ugly.


However, at least we now have a spot for some tiny jackets until we get around to a full-fledged side entry renovation!
 
P.S. I love me some green but I'm getting tired of that colour! I'm thinking it's time for an update.
 
P.S.S. Don't tell Alex.
 
P.S.S.S. I really, really appreciated your thoughtful and supportive comments on my last post.
 
Today's Random:
 
We just finished watching the first season of Downton Abbey. I keep having to stop myself from speaking in a British accent when I'm out in public. ;)

Babies, Baby Proofing, and Baby Gates

40

Tuesday, February 19, 2013

Those eyelashes are out of control people!

Since Cooper was born, I've learned that babies are kind of all-consuming (in the best way imaginable of course).
 
Before he popped on the scene I had these grand plans that I would be one of those super-mom types. I'd have meals on the table at 5:00 p.m. sharp every night. My house would be the cleanest it had ever been. I'd take the dogs on long, relaxing walks every morning. I'd have all kinds of time (while the baby was napping or playing happily on a blanket) to bake, paint furniture, take pictures, exercise, blog, etc. etc. etc.
 
Um, yeah. Reality check.
 
The last few weeks have been so busy! Little Ninja is getting into everything. He's crawling like crazy, pulling himself up onto anything and everything, and even cruising around while holding onto furniture. Suddenly everything in our house is a baby hazard!
 
I've been baby-proofing as much as possible, however I still need to follow the little guy around everywhere he goes since he's not quite steady on his little feet yet. Our living room has large openings into the sun room and dining room so it's hard to keep him in one spot.
 
We've been shopping around for a baby gate that we can use in the doorway between the living room and kitchen. We are currently on our third one in two weeks. Alex is having a real blast installing and then uninstalling each one.
 
First we tried this one. The plastic hinge broke on the second day so we had to return it. I'm kind of glad because the white was so white it almost looked blue. Which obviously is unacceptable. ;)
 
Summer Infant Sure and Secure Extra Tall Walk-Thru Gate

Then, I saw a wooden baby gate (with a cute shape) at Wal-Mart. I brought it home all excited-like because I was going to paint it to match our trim color. After a quick discussion with Alex I realized that if I don't have time to brush my hair then I probably don't have time to paint a brand-new baby gate. So, we returned that one too.
 
Safety 1st Espresso Swing Gate
 
Finally, we found one that we sort of like. It's plain but it works pretty well so far.
 
Munchkin Auto-Close Metal Gate
 
You can bet that I would much rather have some adorable wooden gates that I've seen on Pinterest. Oh, you know the ones I'm talking about.
 
Source: Remodelaholic
 
 
However since we would need at least four gates, it's just not practical for us invest the time into making them right now. 
 
{Alex has been making good progress on the basement and there is no way I'm going to distract him at this point!}
 
So, in response to this itty bitty hurtful comment that I received earlier today......
 
 
........ I haven't been posting anything new lately because I'm a new mom and my bright, energetic, beautiful son has been keeping me verrrrrry busy. :)
 
$5 ball from Wal-Mart? Best investment ever!

P.S. I decided to end all of my posts with some kind of random information. I'm pretty sure I did that anyway but now it's official. Let's see if I can stick with it for more than a day!

Today's Random:

Every morning I put down a big quilt over the living room rug so that the baby has an area to play that is relatively dog fluff-free. I take the lint brush to it a few times a day but I'm not sure why. Every single time I turn my back for a second, when I turn around one of the dogs is lying on the quilt! Gahhhhh! :)

A Little Valentine's Day Shelf

21

Wednesday, February 13, 2013

My picture is crooked. I'm artsy fartsy.
 
 
In case you thought that it was too late to decorate for Valentine's Day.... I'm here to tell you that you've still got time.  
 
Just leave your dishes from the night before in the sink (that's me) and avoid taking your dogs for a walk (that's me) and you'll get some V-day decorating done before tomorrow.
 
Since I decided to do this at the last minute to avoid my daily chores, I had to be creative with things that I already had around the house. I made a giant mess digging through tubs in the basement for things but who needs to know about that.
 
I took my little heart-punch art thingie from a few years ago (links here and here), trimmed it down, and placed it in a smaller white frame:
 
 
I propped some vintage heart cookie cutters (I'm collecting them) into some white ceramic dishes:


I made a little garland with some twine and used some tiny clothespins (from Chapters) to hang little heart cut-outs. I just used the leftover scrapbook paper from the heart-art project:


I'll probably write some cute things on them and give them to Alex tomorrow. Of course I can't share what they're going to say on the internet.
 
{Okay fine. They're probably going to say things like, "I like you because you don't get mad at me when I bring the car home with the gas light on" or "I like when you use your strong muscles to hang drywall in the basement, hint hint."}
 
I used a wooden candle holder to display some tiny fresh flowers in tiny glass candle holders:


The pink tray I've had since my very first year of teaching. It was a gift from a student. It's one of my favourite things.
 
 
So there you go. A last minute Valentine's Day shelf from the biggest procrastinator you know. :)
 
 
I'm a bit sad that my posts have been so few and far between lately. But I do have one in the works called 'Baby Chasing and Baby Proofing' because that's all I've been doing lately!
 
:)
 
Any big plans for Valentine's Day? I think I'll make a chocolate cake for Alex. Don't tell anyone but it's really like a gift for me. Muhahahaha!
 
Other Cute Valentine's Day Ideas Here:
 
Lovely Crafts Linky Party @ Bower Power Blog
Frugal Friday @ The Shabby Nest

Cleaning Tutorial - How I Wash My White Ikea Slipcovers

74

Thursday, February 7, 2013


Howdy, stranger.
 
It's been awhile (I hope you missed me because I missed you) but I'm back to share a little cleaning tutorial that I promised ages and ages ago in this post about white slipcovers.
 
As I've mentioned time and time again, I love my white slipcovers and the extra time it takes to keep them clean is totally worth it to me. (Except when we have unannounced visitors and there are Oreo cookie crumbs ground into the cushions and I don't have time to wash them.)(Embarrassing!)
 
I'm sure there are many different cleaning products and techniques that will also work when washing Ikea slipcovers, however I'm going to share the process that has always worked like a charm for me.
 
{WARNING: This cleaning tutorial is for white, Ikea slipcovers only!}
 
Step 1:
 
The first thing I do is strip the slipcovers off. Once you've been doing this for 5+ years you will learn some techniques on how to get them off quickly and easily!
 
Step 2:


I pre-treat all of the marks, stains, and heavily soiled areas with Resolve Spray N' Wash. I have tried several different stain-removal products and this one has worked the best for me, hands down. It may sound strange but I always bring my bottle of Spray N' Wash upstairs and pre-treat my covers in bright, natural light. If I bring them downstairs with artificial light, it becomes very hard to spot all of the marks and stains. I follow the package instructions and usually let the stain-remover sit for about 5 minutes before washing.
 
Step 3:
 
I divide the furniture and cushion covers into small, manageable loads. I find that my covers always come out cleaner and brighter when I don't overload the washing machine. We have a sofa, loveseat, armchair, and ottoman in our living room and so here is how I divide my loads:
 
Load 1: couch cover
Load 2: loveseat cover
Load 3: 4 loveseat cushions
Load 4: 4 couch cushions
Load 5: 2 couch cushions + 2 chair cushions
Load 6: armchair cover + ottoman covers
 
Keep in mind that I have a smaller, old-fashioned washing machine and not one of those large, fancy, front-loading ones!
 
Step 4:


I set my washing machine to a large or oversized load, regular cycle, and here is the key: HOT water. The hot water really gets the slipcovers clean. The covers will shrink a tad but will get back over the furniture and cushions with some good pulling and tugging. I just tell myself that I'm getting a good arm workout instead of cursing while I do it. 
 
Step 5:


I add laundry detergent to the washer and then load 'er up. We alternate between using Tide and Sunlight detergent, depending on what's on sale at the time.
 
Step 6:


Once the covers are in the machine, I dissolve one scoop of Oxyclean per load into the hot water as the machine is still filling up. 
 
Step 7:
 
Once the slipcovers are washed, I hang to them to dry - either outside on the line in the spring / summer or on the laundry line in the basement in the fall / winter. I've only ever air dried my covers. Just habit I guess!   
 
Step 8:
 
I squish the covers back over the cushions / furniture and then sit back and admire my brand new couches. 
 
----------------------------------------------------------------------------------------
 
We have experienced every kind of spill / stain imaginable, from coffee spills, baby pukes, diaper leaks, muddy paw prints, splats of blood (from the dogs, don't worry it's not like a horror film over here), smooshed chocolate, you-name-it.
 
The only stain that hasn't come out of our white slipcovers has been a splotch where Cooper spit up after eating roasted red peppers. I did a quick spot clean and didn't wash the covers until the next morning which was a big mistake. I was too lazy to wash them the night it happened and now I have to live with a gross red pepper puke stain. (Thank goodness I can flip that cushion over!)
 
Lesson learned. For serious spills - always wash right away!!!!
 
:)
 
What about you..... do you have any tips or tricks for white slipcovers that I should know about?
Related Posts Plugin for WordPress, Blogger...

Cozy.Cottage.Cute. All rights reserved © Blog Milk Design - Powered by Blogger